As Evernote’s prices continue to rise, you might consider migrating all of your notes to a new platform. Previously, Epiphenie has recommended Evernote as a note-taking tool of choice. However, the price of Evernote has increased 55% in two years, going from $45 in 2016, to $60 in 2017, and now to $70 in 2018. To learn more about the price increases, see Changes to Evernote’s Pricing Plans.
Epiphenie can no longer recommend this app, and instead recommend that you migrate to using Microsoft OneNote. For that same $70, you can have the entire Microsoft Office Home suite (including OneNote) and 1 TB of OneDrive storage.

To use OneNote and sync your notes across multiple devices, you must have a OneDrive account. As part of this process, you might consider moving from Dropbox to OneDrive. If you’ve outgrown your free Dropbox account and are willing to pay for cloud storage, OneDrive is a great solution. Otherwise, you can use OneNote with a free OneDrive account, that provides 5 GB of storage for free. There are other tiers as well. For more information, see OneDrive Plans.
Migrate From Evernote to OneNote
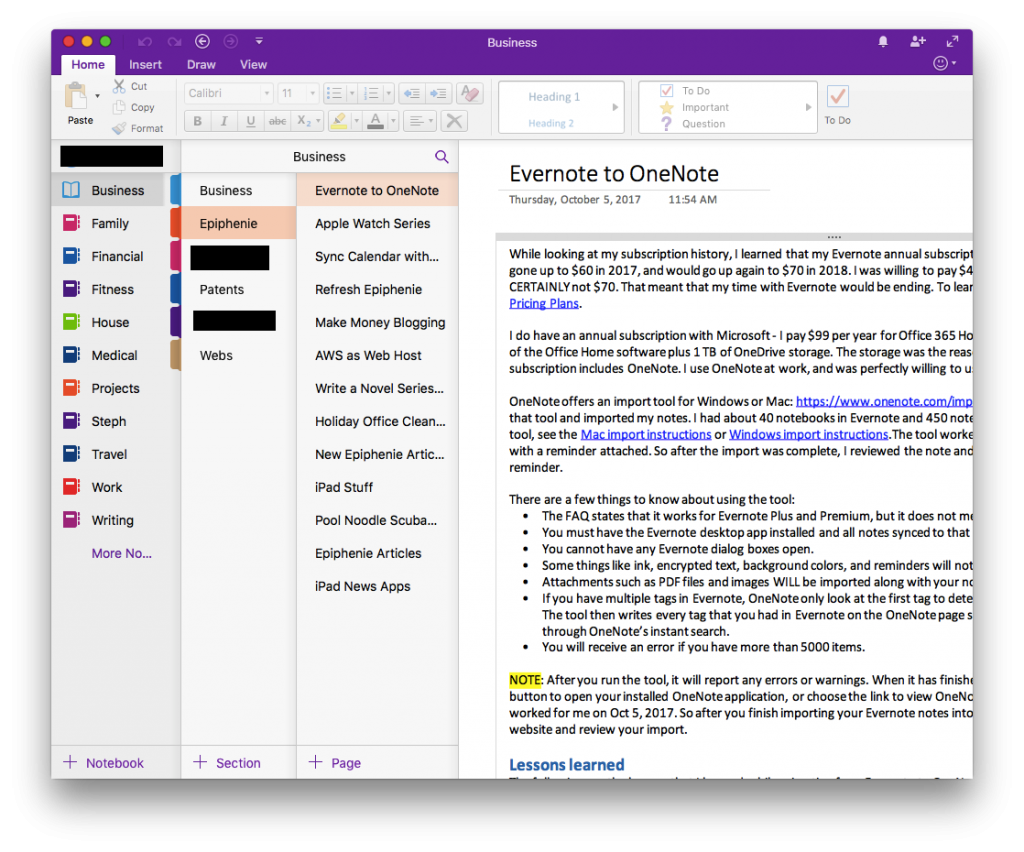
OneNote offers an import tool for Windows or Mac: https://www.onenote.com/import-evernote-to-onenote. You can use the tool to import your Evernote notes into OneNote.
There are a few things you need to know about using the migration tool:
- You must have the Evernote desktop app installed and all notes synced to that application.
- The FAQ (Mac or Windows) states that it works for Evernote Plus and Premium, but it does not mention the Basic (free) plan. If you are using the Basic plan with the Evernote desktop app, it *should* work.
- You must close all Evernote dialog boxes.
- Some Evernote features, such as ink, encrypted text, background colors, and reminders will not appear in OneNote.
- Attachments such as PDF files and images WILL be imported along with your notes.
- If you have multiple tags in Evernote, OneNote only looks at the first tag to determine where to place that page. The tool then writes every tag that you had in Evernote on the OneNote page so you can find everything easily through OneNote’s instant search.
- You will receive an error if you have more than 5000 items.
After you run the tool, it will report any errors or warnings. When it has finished running, you can choose the button to open your installed OneNote application, or choose the link to view OneNote in your browser.
After you finish importing your Evernote notes into OneNote, go to the OneNote website and review your import using the procedure below.
Lessons Learned From the Author’s Migration
The following are the lessons that I learned while migrating from Evernote to OneNote:
- There’s a huge bug in OneNote. Basically, most times that you try to paste ANYTHING using ANY METHOD (
Command/Control-V, right-click, or the Edit menu), the app stops responding and you have to kill it. Please go to the bug and choose “I have the same question” to keep this bug on their radar.
As a temporary workaround, useCommand/Control-Seach time before you try to paste so that your work is synced. Then wait for the “Syncing…” text at the top of the app changes to “Sync Complete”. If it flashes, but doesn’t hang, then paste a second time. - Evernote has hierarchical “Notebooks” and “Notes”. OneNote has flat-structured “Notebooks”, “Sections” (that can be grouped using nesting), and “Pages”.
- Evernote allows for nested notebooks. If you have any “parent” notebooks that do not have notes, they are considered empty notebooks and will not be imported. All nesting is lost in the flat structure of notebooks in OneNote, and you must manually organize your nested structure using the procedure below.
- By default, the tool places all of your notebooks in the “Documents” folder of OneDrive. If you actively use OneDrive, then you might have a folder for your documents that matches the name of a notebook. In that case, the new OneNote notebook name will include the date and time of your import. The tool ignores the notebook file extension of
.urland assumes that the matching notebook name is a naming conflict within the folder. (Seriously, this is ENTERPRISE-LEVEL professional software! This stuff is just embarrassing.) - Because Evernote does not have sections and OneNote does, all of your notes will be placed in a section named “Pages”.
- Some new pages will be “Untitled”, even though the notes in Evernote had titles. There is no clear reason or pattern for this, so you can’t prevent it.
- When you open your notebooks in OneNote, you cannot choose all of the notebooks and open them at once, which is crazy for an Office product. This means that if you have a lot of notebooks, you must open them individually! If you agree that this is poor software design, go to the feedback page and vote. The more people that vote for it, the more likely Microsoft is to add this feature.
- The original creation date of your Evernote note is retained as the creation date of your new OneNote page. (YAY!)
- Notebooks are sorted according to the date that you opened them, though you can manually drag and reorder them.
- Sections and Pages are sorted by the order in which they were added to the notebook or section, and again, you can manually drag and reorder them.
- Sometimes (and for no apparent reason), notebooks won’t sync. A failed sync is indicated with a warning label on the notebook icon. Choose the notebook to open it and type
Command/Control-Sto force the notebook to sync. If that doesn’t work, close the notebook and reopen it, but be aware that you might lose your changes. And yes, that’s horribly inconvenient and very unprofessional – I’m looking at you Microsoft.
Epiphenie specifically did not recommend using OneNote in 2013 because of their syncing issues. See Taking Notes On Your iPad. - If you have used OneNote in the past or at work, you’ve likely used OneNote 2013 or 2016. You should know that the layout is completely different (and not necessarily better) OneNote 365.
OneNote 2013 or 2016 vs. OneNote 365
OneNote in Office 2013 and 2016 have notebooks on the left, section tabs on the top, and pages on the right. The best part of this layout is that in the Notebooks section on the left, the notebooks can be expanded to show the sections nested beneath them.
OneNote in Office 365 has four columns: notebooks, sections, pages, and the page view, in that order. The problem is that when you click inside the note, the notebooks disappear, so you can’t see your list of notebooks, and especially, you can’t see the great notebooks with nested sections view provided in Office 2013/2016. There’s probabl a project manager at Microsoft that’s very pleased with this design, but it’s pretty bad. It forces you to shift from multiple notebooks to a single notebook with nested section groups.
Organizing Your Notes
To make the layout work better with OneNote, you should consider converting all of your Evernote notebooks into section groups within a single OneNote notebook. For example, given the following notebooks and notes in Evernote:
- (Notebook) Family
- (Notebook) Kids
- (Note) 2017-10-15 Birthday Party
- (Note) 2016 Christmas Gifts
- (Notebook) Pets
- (Notebook) Vet Receipts
- (Note) 2016-01-15 Checkup
- (Note) 2017-01-19 Checkup
- (Note) Food History
- (Notebook) Vet Receipts
- (Notebook) Kids
- (Notebook) House
- (Notebook) Mortgage
- (Page) Current Mortgage Scan
- (Notebook) Repairs
- (Page) 2015 Roof Repair
- (Notebook) Mortgage
You could have dozens of notebooks in OneNote such as “Financial”, “Medical”, “Projects”, “Travel”, and more. However, the software is now designed for users that DON’T often switch between notebooks. It’s best that you organize a single notebook in OneNote:
- (Notebook) Steph
- (Section Group) Family
- (Section) Kids
- (Page) 2017-10-15 Birthday Party
- (Page) 2016 Christmas Gifts
- (Section Group) Pets
- (Section) Vet Receipts
- (Page) 2016-01-15 Checkup
- (Page) 2017-01-19 Checkup
- (Page) Food History
- (Section) Vet Receipts
- (Section) Kids
- (Section Group) House
- (Section) Mortgage
- (Page) Current Mortgage Scan
- (Section) Repairs
- (Page) 2015 Roof Repair
- (Section) Mortgage
- (Section Group) Family
Evernote has nesting notebooks and notes. OneNote has notebooks, nesting section groups, sections, and pages. By organizing your notes into a single notebook, you can take advantage of section groups and sections. Section groups appear as black tabs.
To organize your notes properly in OneNote, you must think about how you want to organize them. But before you do that, you need to view your notebooks to confirm that all of your notebooks and notes have been imported.
View and Rename Your Imported Notebooks
Before you open your notebooks in the desktop or mobile apps (a tedious process), go online and confirm that all of your notebooks have been imported by the tool.
To confirm that all of your notebooks have been imported:
- Open your Evernote app and browser side-by-side, with Evernote on the left.
- In Evernote, view your notebooks.
- In the browser, go to your OneDrive folder at https://onedrive.live.com, sign in, and then choose Documents.
- If you’re in the Tiles view where your files appear as thumbnail images, change to the List view. You need to see a table of your files with check boxes. To change your view options, in the top-right corner of the page, choose the tiles icon, and then choose List.

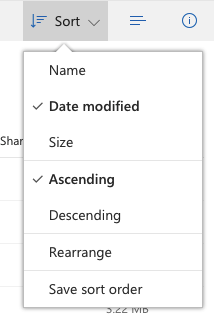
- Sort the list by Date Modified so that all of your new OneNote files appear in alphabetical order at the bottom of the table. To change the sort, in the top-right corner of the page, choose Sort and then choose Date Modified.
- Then go down the list of folders in Evernote and make sure that all of your folders are in the list in OneDrive/OneNote. Keep in mind that any Evernote notebooks that do not directly contain notes are empty and not imported.
- Review the pages to make sure that the right number of pages are in the folder and that they all have titles. For any pages without titles, copy the first few words of the page and search for that text in Evernote to locate the matching note. Use the same title in your new page.
For now, ignore any notebook names that also include a date.

Before you can rename your notebooks, you need to reorganize your OneDrive Documents folder. You have two options:
- Create a new “My Documents” folder and move all of your existing document folders into it.
- Create a new “My Notebooks” folder and (carefully) move all of your OneNote notebooks into it.
To move your notebooks into a new folder after confirming your notebooks:
- In OneDrive online, create a new folder named “My Notebooks” by choosing New > Folder.
- Select the check box next to each notebook that you want to move (which means all of your notebooks).
- Choose the Move to button at the top of the page. The navigation panel appears on the right.
- Choose Documents and then My Notebooks. And then hit Enter on your keyboard. (Double-clicking doesn’t work, and there doesn’t seem to be a button to continue.)
- Go to the My Notebooks folder and choose the name of one of your notebooks to open it in OneDrive online. You only have to choose one notebook, and OneDrive recognizes the new location.
If you want to rename any of your new notebooks, you cannot do it in the app. You have to do it online. This is because when you make changes in an app, the changes are pushed to the online version, and the changes are then pushed to other apps. If OneNote allowed you to change the name of a notebook in an app, it can create major conflicts. Yes, hundreds of other online services to it, but not OneNote.
To rename your notebooks after moving them to a new folder:
- In OneDrive online, select the check box next one notebook that you want to rename.
- Choose the … button at the top of the page and then choose Rename.
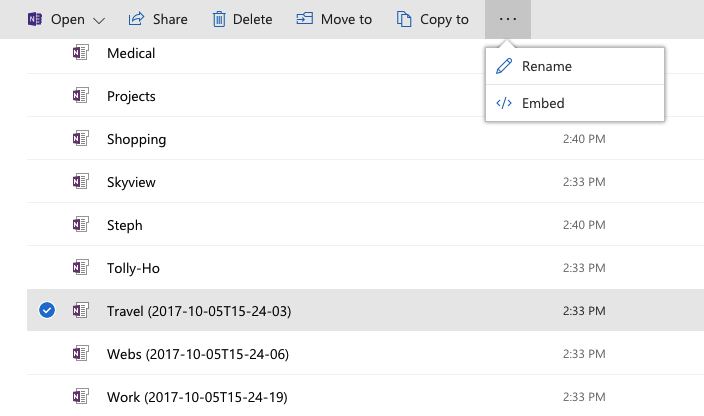
- Edit the name and choose save.
- Repeat this process, choosing one notebook at a time. The … option is not available if you select more than one notebook.
Open Your Notebooks in the OneNote App
When you open the OneNote desktop or mobile app for the first time after running the import, your new notebooks do not appear automatically. You must manually open each folder individually. (You cannot choose all of the folders and open them together.)
To open your notebooks in the OneNote app:
- Open the app.
- Go to File > Open Notebook… or choose More Notebooks from the notebooks panel.
- Manually open all of your notebooks in alphabetical order
- There might be a “Notebook 1” or similar notebook. This is the default notebook that ships with the app. Close that notebook. Wait a few minutes and go back to OneDrive and delete it.
- Create a new notebook that will become your one and only notebook. For example, it could be your name “Steph”.
Organize Your Nested Notebooks
If you had nested notebooks in Evernote, then you must manually organize the nesting in OneNote. Nested notebooks in Evernote can have the following structure:
- ParentNotebook
- Note 1
- Note 2
- Child Notebook
- Note A
- Note B
Your new OneNote notebooks can have the following structure:
- Notebook
- Section 1
- Page 1
- Page 2
- Section A
- Page A
- Page B
- Section Group (container for sections)
- Section 2
- Page 3
- Section B
- Page C
- Section 2
- Section 1
After you have completed the steps above, the Evernote app, the OneNote app, and your browser with OneDrive should all be open. Before you begin organizing your new notebooks, you must create a single notebook and set up the structure. You will then move your imported notes into that new structure.
To create your new primary OneNote notebook:
- Place your Evernote and OneNote applications side-by-side, with Evernote on the left.
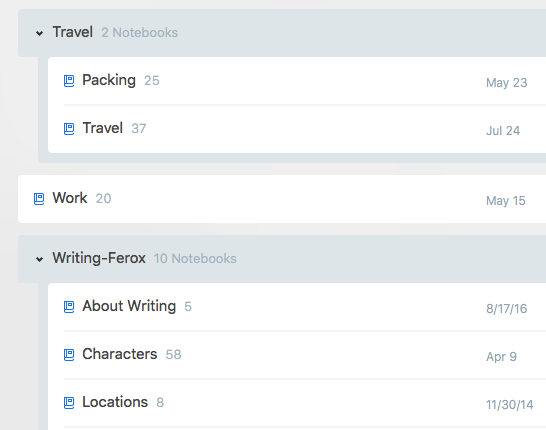
- In Evernote, view your notebooks. Find a parent notebook. In this example, “Travel” and “Writing-Ferox” are parent notebooks:
- In OneNote, open your new notebook (such as “Steph”).
- Your notebook includes the default section “Pages”. Right-click on “Pages” and choose New Section Group. Give the new section group the same name as your parent notebook from Evernote and choose Save. For example, from the image above, in the “Steph” notebook, create “Travel” and “Writing-Ferox” section groups.
- Beneath each section group, create new sections for each of the child notebookes in Evernote. To do this, right-click on the section groups and choose New Section. For example, from the image above, in the “Travel” section group, create “Packing” and “Travel” sections.
- Repeat Step 5 and Step 6 for all parent and child notebooks in Evernote.
- For the remaining single-level notebooks in Evernote, create top-level sections in your OneNote notebook. To do this for the first section, rename “Pages” and delete the “Untitled” page within. For the remaining pages, choose + Section at the bottom of the column to create the section, and delete the “Untitled” page within.
When you’re finished, your new OneNote notebook should have nested section groups and sections that match your Evernote notebook structure.
To move your OneNote notebooks into your single notebook:
- Place your Evernote and OneNote applications side-by-side, with Evernote on the left.
- View your folders in alphabetical order in both Evernote and OneNote.
- In OneNote, open the first imported notebook.
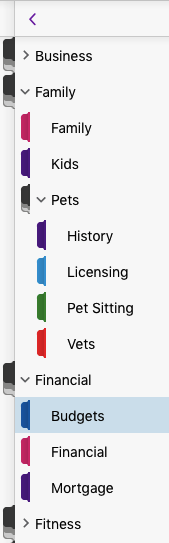
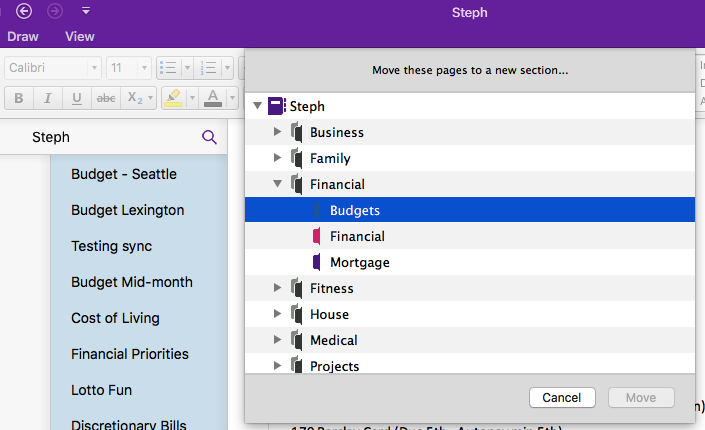
- Select the first page, hold down the Shift key, and then select the last page. This selects all of the pages. Right-click on one of the pages, choose Move Page To… , and then under your new single notebook, choose the section with the same name as your notebook. For example, in the following image, the budgeting pages belong in the main “Steph” notebook, under the “Financial” section group, in the “Budgets” section.
- In the OneNote list of notebooks, right-click the now-empty notebook name and choose Close This Notebook.
- In OneDrive in your browser, select the check box next to that notebook name, and choose Delete.
- For each imported notebook in OneDrive, repeat Step 3 through Step 6 until all of your nested notebooks have been organized.
And that’s it. Your OneNote should sync across the website and any apps that you use.