Blog Plugins Tutorial
Browsing Plugins
Depending on what you’re looking for, there could be a LOT of plugins to suit your needs. Fortunately, there is a large Plugin community located at [Wordpress Plugins]. There, you can search by keyword and sort your results. I recommend that you check out the number of downloads and the average rating of the plugins. If a lot of people are using and liking the plugin, it is probably well-made.
Plugin Compatibility
As WordPress has evolved, significant changes have been made to this open-source platform. While this is great, since new functionality is added, it really affects the plugins. A couple of times, I’ve downloaded a popular Plugin only to find out that it doesn’t work or acts buggy because it was not made for my version of WordPress. So before you download plugins, I recommend that you know what your version of WordPress is.
Find your WordPress Version
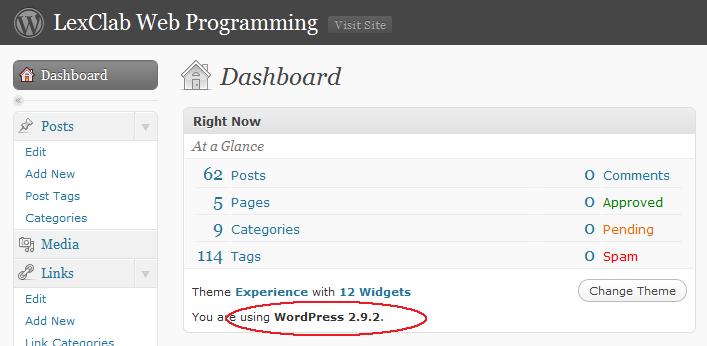
To find your version of WordPress, go to the Administration Panel > Dashboard. If you’re not familiar with this, see the [cref blog-basics-tutorial] Post. Your version will be visible on the Dashboard:

Check Plugins for Compatibility
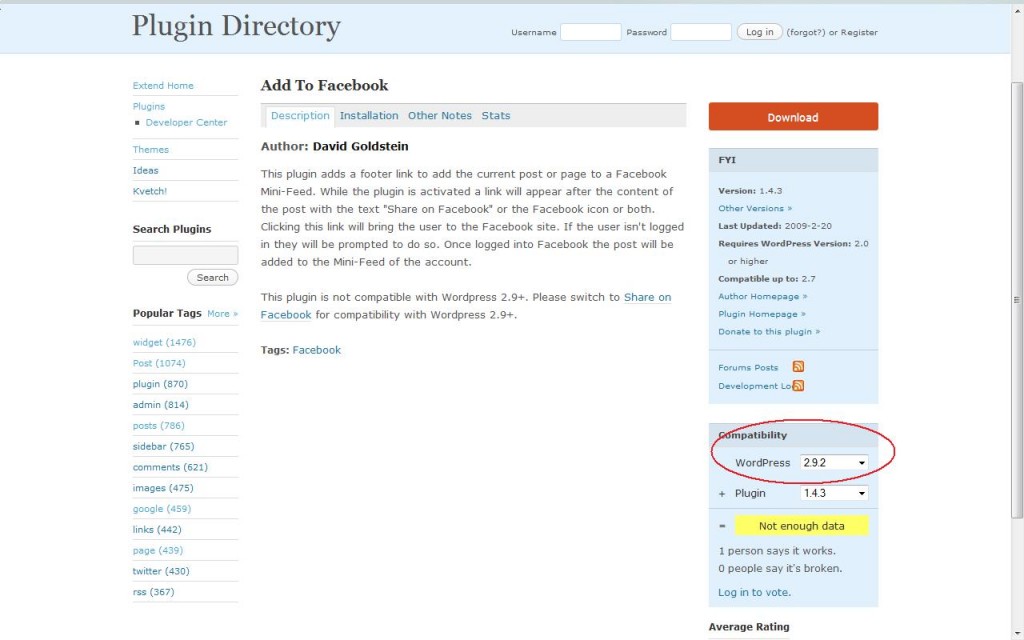
Once you’ve determined your version, you’ll need to watch for compability when downloading Plugins. This information will be in the Plugin page if you have searched for plugins at [Wordpress Plugins].

If you aren’t running the current version of WordPress, you can go to codex.wordpress.org/Plugins/Plugin_Compatibility to get a list of plugins that are compatible with your older version.
Installing Plugins
The installation process will vary from Plugin to Plugin, based on the author and functionality of the Plugin. Because of that, the general instructions for installation aren’t so general. But here are some good guidelines.
Before Installation
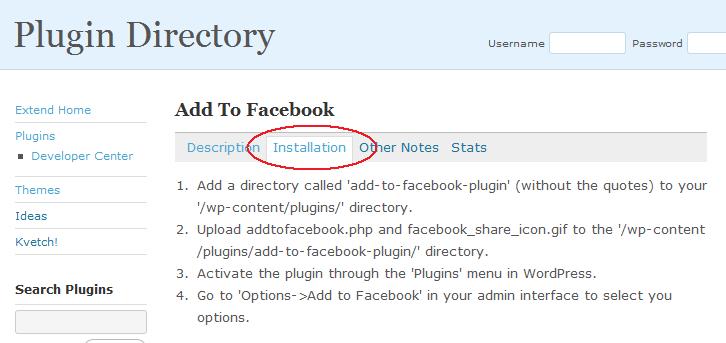
Read the Installation Documentation on the Plugin page. You can access this by clicking on the “Installation” tab. This info will be provided by the author of the Plugin for EVERY plugin.
 I recommend that you leave this page open until you get the installation completed.
Download the zip file. I have a folder in my web development folders called Blog/Plugins. Unzip the zip file to the same location.
Read the Readme file. This will also contain the installation instructions. It could be helpful to print out this file to reference during installation.
Backup your current configurations and data. If you’re not sure how to do this and have a GoDaddy account, see the [cref blog-backup-tutorial] Post.
Plugin Installation
These are general directions. Be sure to check for specific directions given by the Plugin author.
- Look inside your newly unzipped plugin folder. if there is only one files (xxxx.php), you can upload that file directly to the wp-content/plugins folder in your WordPress directory online. I suggest using the [FireFTP Add-On] for Mozilla. You can also use the GoDaddy Online File Manager or FTP client, or another FTP client of your choice.
- If there is more than one file in your unzipped folder, you will need to upload the whole folder to the wp-content/plugins folder in your WordPress directory online. Sometimes, the folders are nested: /pluginnameV2.3/pluginname/. In that case, get the lowest level folder – the one that contains the actual files.
- Activate the Plugin:
- Go to your Administration Panel >Plugins > Installed. You should see the new plugin automatically installed. If it is not there, check that you followed the above instructions correctly. The folder may not be in the right place.
- Click on the “Activate” link to turn the Plugin on.
- Make any changes to templates or files as required in the instructions in the Readme file. Change any settings in the Settings menu if required.
Modifications
Sometimes it is necessary to make changes in the code of plugins. You will need to be familiar with PHP, HTML, CSS, and changing file permissions on your server. You can get more information on that in the following posts:
- [cref php]
- [cref html]
- [cref css]
- [cref scheduled-tasks-tutorial] – This page is not specifically about permissions, but it does require permissions changes and shows how to do that on the GoDaddy servers.
If you make any changes in your code, I recommend that you add a comment with your name or shortname or something so that you can do a search and find that location again if you need to change it back. Also, I recommend keeping a copy of the original and the changed file in your Web folders at home or on your thumbdrive or wherever you store your files. This will help you in the future if any problems arise.


