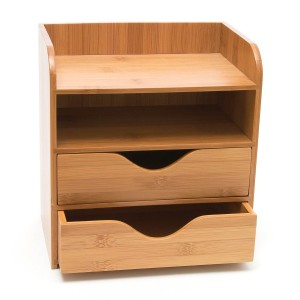
This week’s project in the Organized Life Series is to organize the piles, stacks and folders of office papers. The goal of many a tech-savvy person is to reach the ideal state of a paperless office. Or at least nearly paperless since the IRS still likes you to keep those receipts. Others like the tactile feel and ability to flip through a stack of papers easily. Either way, you’ll probably want a little bit of each. That’s our goal for this week. Depending on the current state of your office, this could be a quick project or one you’ll have to spend every evening and all weekend doing.
Picture it. You walk in with the mail. You sort it over the trash/recycle bin in your office, weeding out the junk mail immediately. You open all your mail in under a minute and organize it where it needs to go without taking a step. Once a week you grab your To-Do or Action folder and take a few minutes to take care of stuff. The bills practically (or literally) pay themselves. That’s the goal in this week’s thread of the Organized Life Series.
This week’s organization will be centered around your home office papers. Whether you currently have a box of papers that “eventually” need to be dealt with or stacks of papers cluttering your desk, what you really need is to take time and get them all cleared out properly and develop a simple system to keep organized going forward.
Our tasks this week will begin with sorting current piles of paper into Trash, File, Scan and To Do boxes. As you are doing this, fill out the bill sheet – payee, address, payment, balance, due date, payment method. Put recurring bills into a calendar to make sure that nothing gets missed in a busy month. If some bills can go paperless, save the environment. Consider automating some bills if you can. You’re also going to get a filing system in place to control your papers as they arrive in the future.
#1 - What You'll Need
In order to complete this project, you’ll need the following:
- TIME!!! This project could take anywhere from several hours up to even 100 hours. Do your best to get it done this week so we can move on to the next project.
- SPACE!! Find somewhere like the kitchen table or a clear desk to spread out.
- A good-quality shredder or access to confidential document disposal
- Boxes for sorting
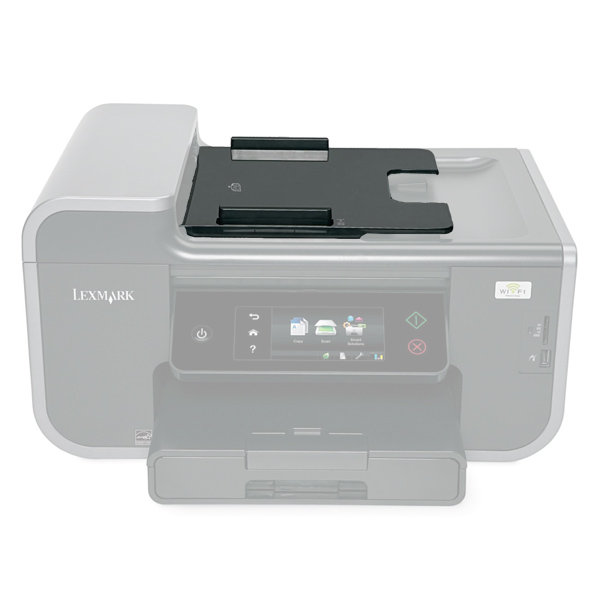
- A scanner or a printer with a built-in scanner. If you need to buy something, get a printer with an ADF (Auto Document Feeder) to the scanner.
- A file box or filing cabinet. If you’re an adult, buy a good-quality file cabinet that will hold up to a full drawer and last for years. Don’t forget to consider buying used.
- Hanging files and file folders. If you had a ton before, they can be repurposed.
- Handheld label maker. It will make your files and any organizational system much neater, cleaner and easy to read. You can get out that old funky 1970’s flying saucer label maker, or even get some Avery labels and print your own. This is my baby:
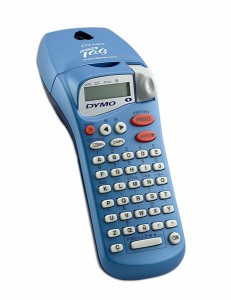 The Dymo LetraTag. You can get a new one on Amazon or Walmart. I like it because it’s handheld-sized so I can carry it around easily. And if I suddenly need refill tape, I can run to Walmart and get it at midnight.
 - This Printable Bill Sheet
- Your undivided attention – You’ll want to sort carefully and be on the lookout for bills and statements. For example, when you run across a receipt for your annual Amazon Prime subscription or your Google Data upgrade, you’ll want to write those on the list. It’s especially important to make a note of those annual auto-pay services that you might forget. Also record your regular bills such as utilities, loans, and credit cards.
#2 - Set Up and Sort
Make yourself a nice workspace to get started. It’s best to work on the dining room table or a large, clear desk surface. Make sure you have a great shredder or a box to store papers that need to be shredded. Have your paper recycling bin ready if you’re into that sort of thing. Drag the big kitchen trash can in as well.
Then grab a box (or several, depending on your level of clutter) and gather all the papers from around your home. Bills, children’s report cards, coupons, mail, magazines, etc.
Types of Files
Most people over 25 have an existing but outdated file system. Your old file system may contain one or many more of the following:
- House/Rental – It’s important to keep a copy of your mortgage or lease.
- Loans – Documents for your loans could include Student Loans, signature loans, Home Equity loans, 401k loans, etc.
- Employment documents – Contracts for hire, manager evaluations, raise documentation, employee handbooks and more.
- Kids Activities – Receipts for camps and sports clubs.
- School records – For adults and kids. This could be report cards, transcripts and maybe even certificates.
- Auto – Purchase information, service & repairs, records, payment statements.
- Insurance – Auto, Home (or renters), Life, Identity, etc.
- Subscriptions – Receipts for product, magazine, or online service subscriptions
- Clubs – Club memberships such as Alumni or professional clubs. AAA would probably go here.
- Travel – Hotel, air, and car receipts. Membership numbers for frequent flyer and hotel clubs.
- Investments – IRAs, 401ks, stocks, or other investments.
- Charity – Yearly receipts for donations
- Bank Accounts – Although you should balance your accounts at least monthly, you should keep either hard or soft copies of your bank statements.
- Ebay/Craigslist – When you buy or sell things online it’s good to keep a record so the other person doesn’t try to claim they were defrauded.
- Tax Returns – The well-known rule here is 7 years. Almost all audits occur within 3 years, but do you really want to mess with someone who can legally treat you as guilty until proven innocent?
- Legal Documents – This includes debt collections, school transcripts, Life Insurance policies, and other legal documents. There are some things you’ll need to keep the original of as long as you live.
- Critical Personal Documents – Marriage licenses, birth certificates, and other difficult to replace documents should be kept in deep storage—preferably a waterproof and fireproof deep storage location. (See the How to Replace Important Documents article on how to get copies of anything you’re missing.)
- Medical documents – Receipts and Test Results are important to keep.
- Small Business – If you own a small business you’ll need to keep receipts, invoices and proof of payment for as long as you would keep tax documents.
- News Clippings – You may occasionally get clippings for your aging grandparent appearing in the local paper. Or your child plays a prominent sport. Or you were on the front page of the paper while running a marathon (hopefully not for that mug shot!)
- Coupons – If you’re a couponing nut, you probably already have a system. If not, you should at least get a minor system.
- Manuals/Receipts – You have manuals and receipts for home products, furniture, electronics, appliances, tools, toys, computers, peripherals, software, clothing, gifts and more. (Are you missing a manual? Amazon has a repository of electronics manuals and an efficient Google search will uncover those. See the directions from Digital Inspiration.)
- Utilities Bills – Electric, Gas, Water, Sewage, Trash, Phone, Cable, Internet…
- Credit Card Statements – Assuming you’re not a financial genius or independently wealthy, you probably have these. You may consider placing a credit card statement that has a large purchase on it like an HDTV in with the warranty information for that large purchase if your credit card has extra consumer protections that would help with replacing the larger purchase.
- Hobbies – Notes, ideas, receipts, etc. The manual and cards from your SCUBA class.
- Keepsakes – The artwork and homework your kid brought you, for example.
- Recipes – Sometimes you print them out for later and they pile up. (This subject will have its own topic later!)
- Fitness – Yep, the paperwork for the P90-X DVD set you bought. Different things you’ve printed off the internet.
- Estate Planning – Will, DNR, List of Passwords, Letters to those left behind – these should also be kept in deep storage—preferably a waterproof and fireproof deep storage location.
Getting Started
It’s time to start sorting into our categories. Remeber, as you sort, get rid of all staples, paper clips, and rubber bands. For everything in your pile/stack, you should consider the categories in this order:
TO-DO
The to-do stack will contain actionable items. An example would be your homeowner’s association bill that is overdue. That subscription that you let run out. That subscription that you let stay on autopay that you want to cancel. A birthday card from your aunt whose address you need to enter in your contacts. A stack of magazines that you WILL get through in the next week. And so on.
This category goes first because after the action you may need to scan or file the item.
SCAN
This could potentially become a very large pile. This category is defined as you want to keep it but don’t need a hard copy, or it’s so important that you want it scanned and the hard copy stored safely.
This category is near the top because after you scan something, you still have a paper that needs to be dealt with.
FILE
The goal is to keep this pile as small as possible. This category is defined as for legal or sentimental reasons, I need to keep a hard copy of this and I can’t scan it
SHRED
The shred pile will contain items that you don’t need that have sensitive information on them such as your social security number, your account numbers, your birth date, etc. These are the papers that identity thieves are looking for in your trash can and recycle bin. If you have easy access to a confidential/destroy bin, that is ideal. You can get rid of stuff in bulk. Otherwise you should invest in a good shredder.
RECYCLE
This is where you put the empty envelopes, old newspapers, magazines, and papers that you would hand to anyone off the street. You’re being a good citizen, but not an idiot.
TRASH
Unless you don’t have a recycle program near you, this will be a fairly small pile. Plastic packaging, staples, rubber bands, paperclips and the like go in here.
While sorting your documents, use the Printable Bill Sheet to keep information on your bills for organization later.
#3 - Scan Documents
Once you’ve finished your sorting, it’s time to dig in. Start with the documents that need to be scanned. (To-Do and actions items will come last.)
Ideally, you have a printer with a scanner and ADF.
The ADF, or Auto Document Feeder is the tray on the top of your printer. You can place a stack of papers in the tray and they will all be scanned together. Depending on your software, you can control how they are scanned.
- Scan to Photo – Using this setting, a flatbed scan will save the document as a photo and the ADF scan will save the stack of documents as a series of individual photos. This means that if you have 4 pages and tell the software to save it as an image titled 2012Medical, you will have the following files: 2012Medical[1].jpg, 2012Medical[2].jpg, 2012Medical[3].jpg, 2012Medical[4].jpg. Or something similar. The problem with this is that a quality scan will be a large file, and to get the file small enough you lose a lot of details.
- Scan to PDF (recommended) – If you do an ADF scan to PDF, you will get one multipage document. PDF stands for Portable Document Format. Anyone can open this file type on their computer or device with the free Adobe Acrobat Reader. The advantage to using this scan method is that it doesn’t assume you have a photo. It assumes you have a document. It detects the background (usually white) and simplifies that background. It uses some smart algorithms to determine what part of the document can be compressed down to nothing and what details need to be maintained. This method results in a smaller file size with excellent readability. Do realize that however large the stack is on the ADF, that is the number of pages in your new document, so only stack like items together. If you have the expensive software (Adobe Acrobat full version or Adobe suite with Bridge) you can later split the ADF, but most people do not.
- Scan to OCR – OCR is optical character recognition. This is useful if you want to convert a paper to an editable document like a Microsoft Word document. It can be pretty time-consuming to fix, so do this one page at a time and only if necessary.
Sort Your Documents
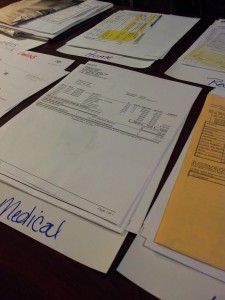
Before you begin scanning, give yourself plenty of space and sort your documents. Look at the list above and think of how you would like your files organized in your computer. Get a stack of plain (or scrap) paper and a pen or sharpie. Label each of the pages across the bottom of the sheet with a category. Spread the pages out across your workspace. Then sort the papers onto stacks on the sheets leaving the category name showing. While sorting, use the Printable Bill Sheet to keep information on your bills for organization later.
After you have gone through all the documents to be scanned and they are sorted into their categories, pick up a category and see if you need to make any sub-categories. For example, you may want to throw all of your utilities together in one file and not care for the order. Really, when are you going to access those? Or you may want all of your electric bills together. Or better yet, all your electric bills in separate stacks by year in order by date. You decide how organized you want to be. Remember, if you scan to PDF, every stack becomes a page in a single document.
As you make the stacks, make SURE THERE ARE NO STAPLES OR PAPER CLIPS!
Scan Your Documents
You have a stack ready to go and it’s time to scan. WAIT! Before you scan, you might want to make sure you know where you want your document to go. And perhaps have a folder ready to go. Once you’re ready:
- Put your stack in the ADF as the label indicates. It will be face-up or face-down depending on your manufacturer. If you’re only scanning one page, it will be less hassle to do it on the flatbed scanner.
- Open the printer software on your computer. It will look something like this:
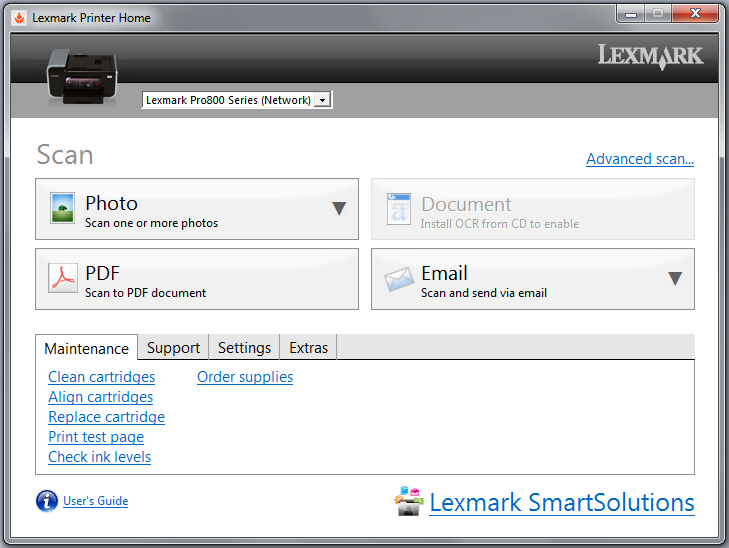
- Click on the PDF button. (Or whichever method of scanning you have chosen.)
- WATCH THE SCANNER! Don’t walk away. If there’s a jam or a page gets skipped, you’ll have to delete the file and start over. If you have a particularly large stack like 5 years of bank statements, you can load part of the stack and wait until it gets down to 1 or 2 pages and slide the rest underneath. It works. I’ve done it.
- Once the scan is complete, choose the location and name of your file.
Sort the Scanned Papers
Once the pages are scanned and saved, you need to decide what to do with the hard copies. They should go into File, Shred, Recycle, or Trash.
Make a Backup
Further down in this series we will be working on a complete backup system. The best backup systems do an automatic local backup with an additional off-site backup in case of fire or computer theft. For now, you need to back up the files you just saved. You can do that using a cloud solution such as Dropbox, or by using a thumb drive. If you use a thumb drive, take the USB drive to work and leave it in your desk. You just want to have a copy of the files on your computer and away from home.
#4 - File Documents
You have a good quality filing cabinet (or a substitute). You have hanging file folders with Tabs and label inserts. You have folders to place inside them. You have a label maker and some extra cartridges in case you run out. You’re ready to set up your filing system.
Sort Your Documents
Before you begin filing, give yourself plenty of space and sort your documents. Look at the list above and think of how you would like your files organized in your drawer. Pull out a hanging file folder for each category. Print a label for each tab and insert the tabs.
Spread the hanging folders out across your workspace. Then sort the papers onto stacks on the folders leaving the category name showing. While sorting, use the Printable Bill Sheet to keep information on your bills for organization later.
After you have gone through all the documents to be filed and they are sorted into their categories, pick up a category and see if you need to make any sub-category folders. For example, you may want to have a hanging folder for Insurance, and inside folders for Auto, Home, and Life. Or you may want all of your insurance together. Or better yet, all your Auto Insurance forms in separate stacks by year in order by date. You again decide how organized you want to be.
File Your Documents
Once you’re sorted, start placing the folders into your cabinet. That’s the easy part.
#5 - Shred Documents
Take the documents to a Confidential Document Disposal Site. I have access to one at work. If you do as well, I recommend you use it. You just grab documents by the handful and toss them in. There probably are public ones, but there may be a fee.
Use a Shredder at Home
This one is super easy, but can be time consuming. If you need to purchase a shredder, look for the life of the warranty, the number of pages it can handle at a time, and make sure you get a cross-cut model. This is important enough to say again – make SURE THERE ARE NO STAPLES OR PAPER CLIPS in your stacks of paper! Keep an eye on your receptacle (bin) and empty it if it becomes too full as you shred. Be conscious of the the number of sheets you can shred at a time. Watch for jams.
#6 - Recycle and Trash Documents
Get rid of them! You know how.
At this point you have taken care of all of your papers and are left with 2 things. Your Bills List and your To-Do stack. Your Bills list is about to go to the top of your To-Do stack.
#7 - Create a Bill System
Begin with the end in mind. What you’re going to accomplish will save you a lot of time and stress. When a bill comes in the mail or in email, you will review it for correctness and not worry because it’s set up to be autopaid. For those things that you want to handle manually, you will get an email or calendar reminder to get it done on time.
While going through all of the papers in your office space you should have come across a good number of bills. You should have been surprised to run across receipts for things that will reoccur annually and automatically like your American Greetings Printable Cards subscription or your annual HOA dues. You’re now going to take that list and get to work automating everything you can or want to.
Access each Bill’s online account.
- Go to the website listed on the bill that you recorded. Create an account if you don’t have one or Log In. If you don’t remember your old password, reset it. Speaking of passwords, in two weeks you’re going to work in the Organized Life Series to update your password system using a free service like LastPass. You don’t have to get started with it yet, just make sure you have SOME system for your passwords now so you won’t forget them all by next month.
- Verify your online information – your name, email, address, etc. As for Email, in two weeks you’ll be developing a new email system in the Organized Life Series. I recommend using Google’s Gmail system of email, filters and calendars but you can work similarly in the system of your choice.
- Go Paperless. If the account has the option go to paperless, do that. Here’s what will happen – every month you will receive an email from the company with a link to your bill. Frankly, unless you’re a paper lover, this is a better option. You open the PDF and save it to your files. No paper to scan or file!
- Autopay. Decide what accounts you want to autopay. The companies will autodraft your payment from your account so you don’t have to write a check every month. You could also set up autopayments through your bank’s online Billpay. Most bank accounts offer this service for free. Next week in the Organized Life Series we’re going to develop a budget and payment plan. You’ll decide if you want multiple bank accounts (which I recommend) and what bill will be paid out of each account.
Reminders
- Sort your bills into the following categories: Autodraft, Autopay, and Manual Pay. For example, mobile phone and credit card statements can vary, so pay those manually to force you to keep an eye on them. Paying manually can mean anything from writing and mailing a check to Online Banking to going directly to the website and paying there.
- Decide how you want to be reminded and for which bills. Jot each down on the list.
- Choose your reminder system. This is where a system like Google Calendar comes in handy. You could use any online calendar system or the one in your mobile phone. My instructions are specific to Google.
- Create a calendar. In Google Calendars, create a new calendar.
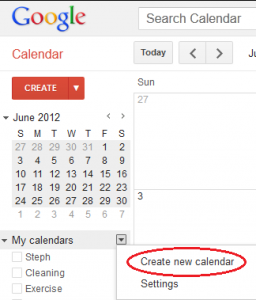 Then name your calendar and give it a description. Once you’ve created it, go back into that calendar’s settings and click on “Notifications” to set up reminders. You can choose SMS, Email, or pop-up.
 This means that Google will text your mobile phone at the time that your event is scheduled. Also, if you choose to do Mobile reminders, you should probably have an unlimited text messaging plan on your mobile phone. Otherwise it could get expensive fast.
 - Enter your individual events as listed on your bill sheet.
That’s it! You did most of the work by filling out the Printable Bill Sheet.
Save Your Bill Sheet!
Don’t throw away that Bill Sheet when you’re done! You’ll use it next week when you organize your finances! See the Organized Life Series for more details.
#8 - Your New Filing System
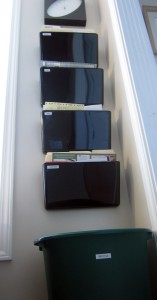
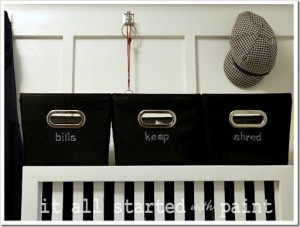
Your incoming office papers need a place to go as soon as they come in the door. That means setting up a physical place where you can sort papers in to Do, File, Scan, Shred, Recycle, and Trash quickly and easily. Here are some samples:
Get your system set up. You could even grab a few empty shoe boxes to get you started. If you get magazines, have a basket handy to place them into. Once your system is in place, here’s how you execute it.
Daily
Open mail as soon as you bring it into the house. Move things to Do, File, Shred, Scan, Recycle, or Trash immediately. Put magazines and catalogs in a basket or into your To Do area.
Weekly
Take action on the Do stack. Empty the magazine/catalog basket. Read them or toss them. If you run across articles you would like to keep, tear out the page and put it in the scan pile.
Monthly
Take action on the Scan stack. Scan and properly name papers. Then either shred, toss, or file the paper.
Take action on the File stack. For any paper bills that you receive, shred the old ones. Once a month take a few minutes to read over the labels in your file cabinet and determine if any files can be archived by scanning and tossing.
Take action on the Do stack. If there’s anything that has been rolling over for weeks, DO IT or toss it.
Yearly
Once a year you’ll be going through files for information related to your taxes. This is a great time to do a little spring cleaning. Shred old files, toss files related to projects that aren’t needed anymore. Any old bills, receipts, and such that aren’t needed for taxes can go. Look for items you can archive by scanning and tossing.
Stick to the System: Rome wasn’t built in a day. It takes time to get in the habit of staying organized. You took the time to get your Office Papers in order by making decisions, sorting, labeling folders, organizing digital files, shredding, and archiving. Once you have this out of the way all you need to do is stick to the system you developed and the papers will naturally find their way into your filing cabinet or march themselves to the scanner and shredder when it’s time for them to go. This is one habit you won’t want to break.
You can apply the same concepts to your work documents as your home office documents.

