You love to read and own a lot of paperbacks. Either there is no Kindle version of those books, they’re out of print, or they cost more than you paid for the books you already own. But you’d love to read a series again. You can!
Legal: Before considering the legality of a situation, I begin with my own personal morals. I purchased these books. I should be able to make a digital copy for my personal use in my own home. I will not be sharing these files. I will not be selling the original books. In all acutality, they will be destroyed by the process. Nobody else will ever own these books. I will not be selling any digital copies or making copies for friends. I do not pirate any form of media or download copies from the internet. Nothing that I am doing in relation to this article is costing the publishing industry industry a dime.
Moral issues aside, there are legal implications to copying your book collection.
Generally speaking in the US, the copyright holder possesses the sole right to reproduce his or her copyrighted material. By reproducing digital portions of your textbook, you may be committing a violation of The Copyright Act. When it comes to reasonable personal use, the law really isn’t on your side. The advantage you do have, in most cases, is anonymity. If you’re breaking copy protection so you’re able to use legally-obtained copyrighted materials in the way that you want without sharing it, it’s virtually impossible for anyone to find out. It’s also very unlikely that you’d prosecuted for copying your book solely for personal use because proving damages would be difficult and not worth the cost. For the most part, you’re in the clear and really only have to worry if you find yourself in the highly unlikely circumstance of having your hard drive seized during a legal investigation.
That said, how do you scan your paperbacks and hardback novels (or even textbooks) so that they are optimized to read on your Kindle?
#1 – Remove the spine of your book
Yes, you will have to destroy your book and you will need access to a piece of professional machinery. In my case, this is where working for a printer company came in handy.
Make sure you cut off all of the spine, but as little of the pages as necessary. You want to make sure there is no glue to jam up your scanner, but don’t want to cut off any of the words or the cover data.
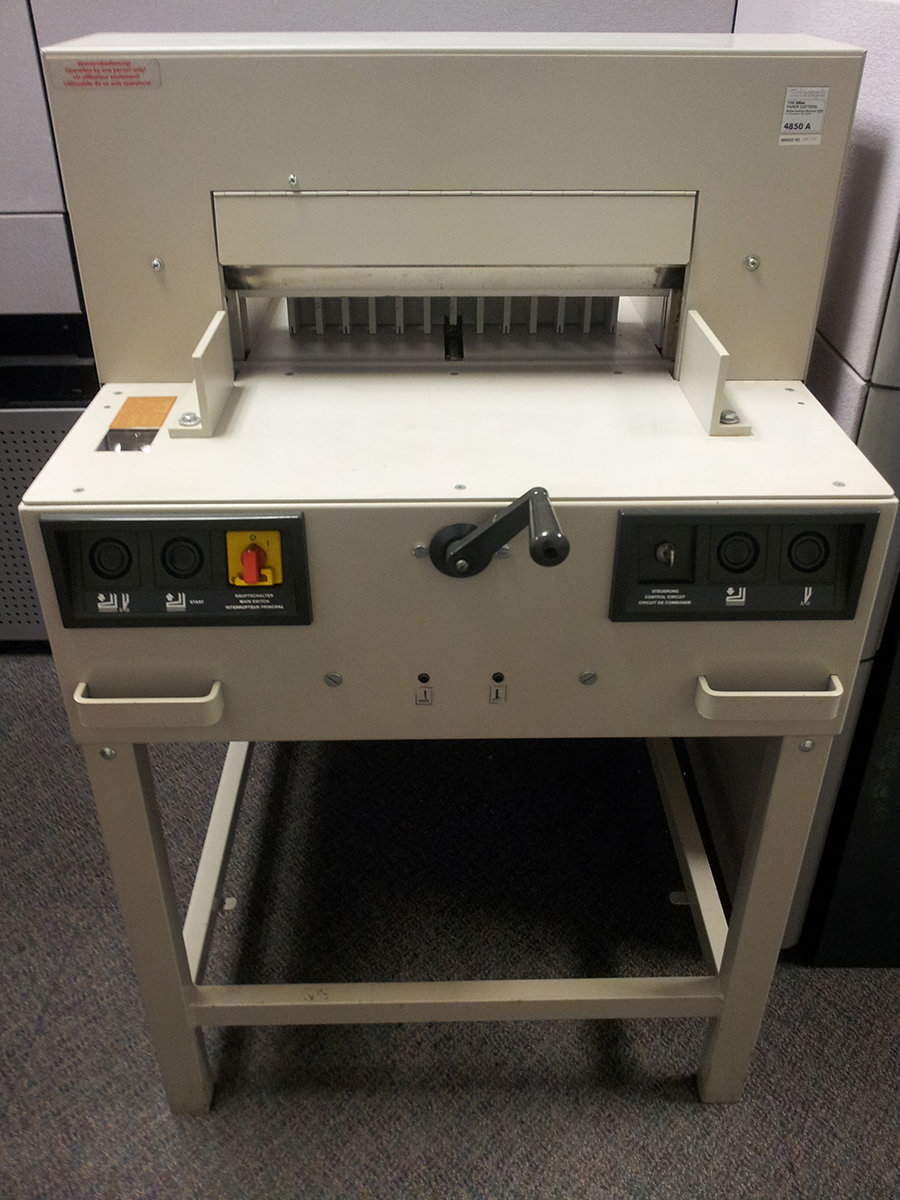
This is an industrial paper cutting machine:
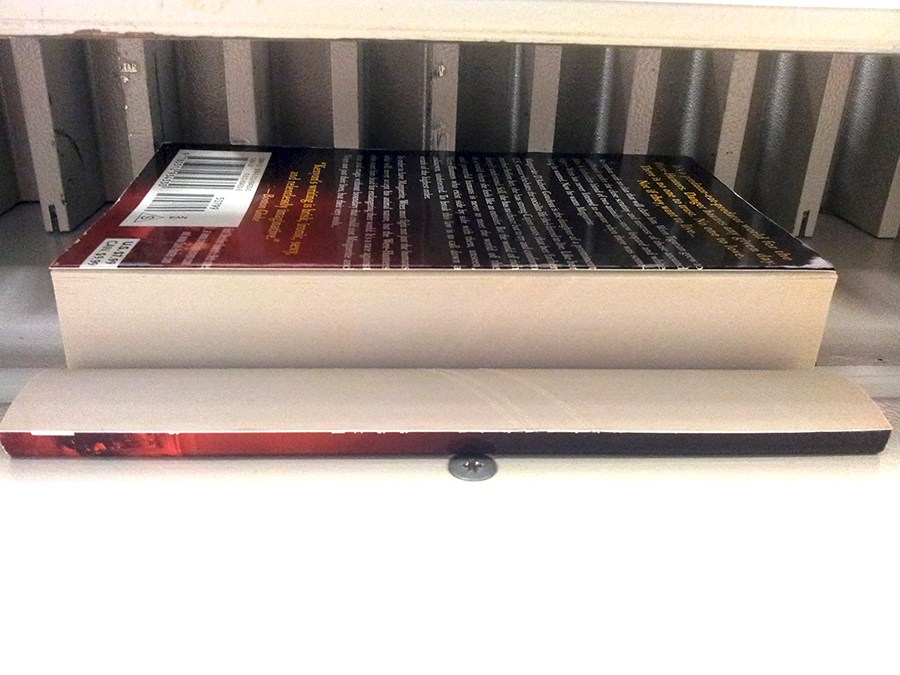
This sucker is super heavy-duty and would cut through bone. It has all sorts of safety features. It takes 2 hands to push the button to lock the stack in place and it takes 2 hands to engage the blade. However, it de-spines a book nicely:
If you have a hardcover book, you’ll need to cut off the hardcover with a razor blade or hobby knife first.
If you are a college student, check around your campus. The design department might have one of these machines that you can get access to. Otherwise, you’re probably going to have to go to a local print shop and pay them to do it for you. They probably aren’t going to let you use their expensive and/or dangerous equipment.
#2 – Measure the book
You will need to know the size of the book you are scanning, so measure the pages after you have removed the spine.
#3 – Scan the book to PDF
You are going to need a professional printer/scanner to do this job. Your home & office printer is probably not capable of double-sided scanning. Exact instructions will vary by manufacturer, but the basics are this:
- Setup – Go into setup and enter your settings. You want 2-sided scanning to PDF. You know the measurement of your pages. Do a custom scan. 150dpi is faster, but doesn’t seem sufficient for OCR, so scan at 300dpi. Unless the printer/scanner is directly connected to the computer you’ll be using for edits, I recommend using a thumb drive for file storage. Actually, bring 2 of these. Commercial printer/scanners have a USB connection on the front for just this purpose. Set Save to USB in your settings.
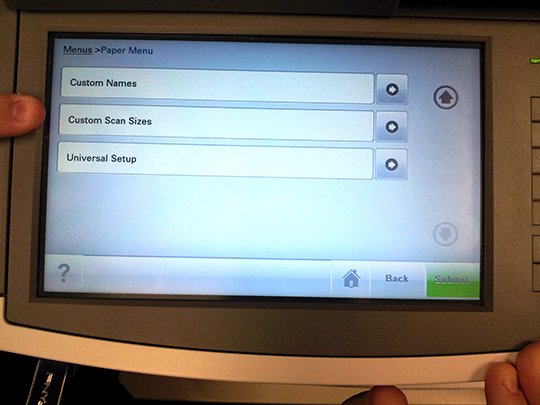
- Split your book into stacks – You aren’t going to be able to put a novel into the slot at once. As the stack gets down to a few pages, stick the next stack underneath.
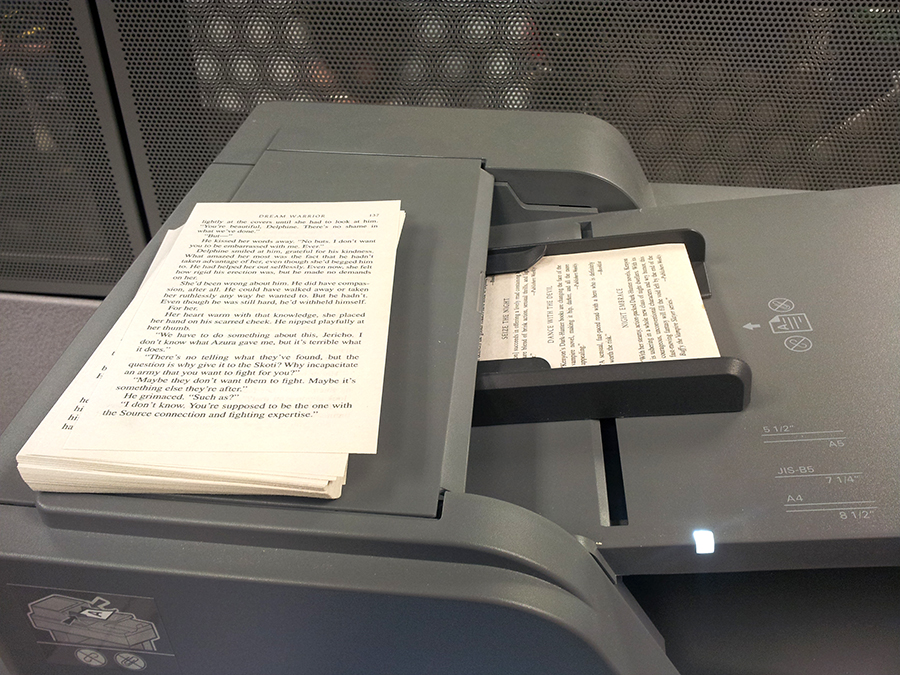
- DO NOT LEAVE – It’s important to watch the scanner while it is scanning so you can spot any problems like a double-page pull where a page gets skipped or a paperjame.
- Deal with paperjams – The first book that I did didn’t jam at all. The second one had gotten wet years ago and jammed repeatedly. Let’s say that your stack jams on page 100. Pull out the jammed sheet. Rescan pages 1-99. The scanned info was lost in the jam. (At least mine was on the scanner I was using.) Then, using the flatbed scanner, scan the front and back of the jammed sheet into a PDF (make sure you do it in the right order). Then continue with the rest of the stack of pages. Your book will have multiple PDFs, but we’ll deal with that in Acrobat when we convert the book format.
- Remove USB – Take your first thumb drive to the computer where you’ll be processing the PDFs.
- Use second USB – Once you get the PDF processing, bring the second USB drive to the printer/scanner and start scanning the second book. The processing takes as long as scanning a book.
#4 – Put all PDF Files Together
To put together PDF files, you will need access to Adobe Acrobat Pro. The full version is $449. The student/teacher version is $119. This applies if you are the PARENT of a student as well. Or you can get it as part of the CS Design Standard Suite for $350. (For me it’s SSSOOOOOO worth $350 to have Acrobat, Photoshop and Illustrator.)
When you open Acrobat Pro, you’ll see the welcome screen has an option for combining documents into a single PDF:
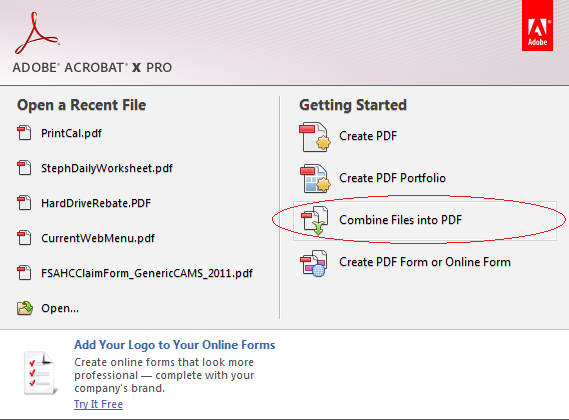
You will be prompted to select your files. Choose all the PDF files on your thumb drive. Make sure they are in order. You can even check the creation date.
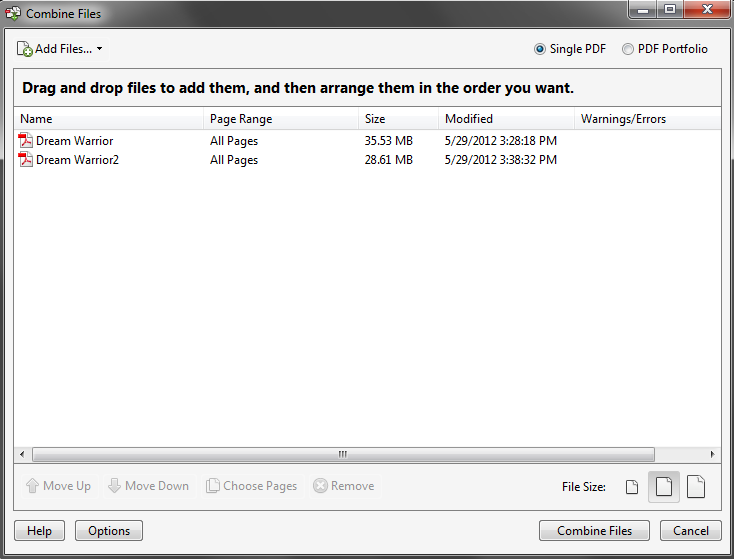
Make sure the Single PDF box is checked at the top, change to the smaller file size, and hit the Combine Files button. Let it run. It will take a while. This step won’t take long. Stick around.
You’ll see the PDF displayed in Acrobat Pro. Skim through it and make sure everything looks good. No missing pages, no crazy skewed pages…

Save the file as a PDF. Name it with the word Full in the title. My book at this point was 64MB. That’s a little large. We need to make it smaller.
#5 – Adjust the PDF
This step will require that you have a full version of Adobe Acrobat or other similar tools that can read/write PDF format. The first part is to run OCR (optical character recognition) which converts the images of the letters into actual text that can be highlighted, copied, or searched upon. To execute this in Adobe Acrobat Professional 7.0, from the menu select Document >Recognize Text Using OCR >Start. In Adobe Acrobat X Pro, select View > Tools > Recognize Text.
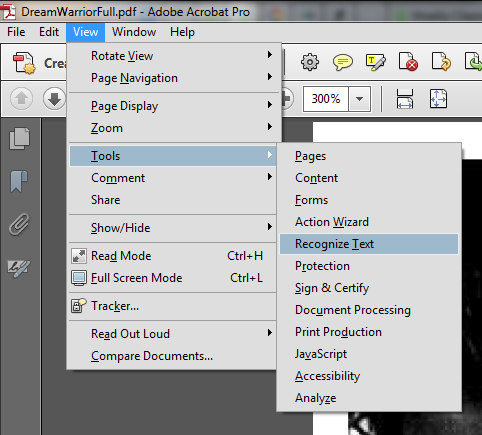
Tell it to check In This File and All Pages.
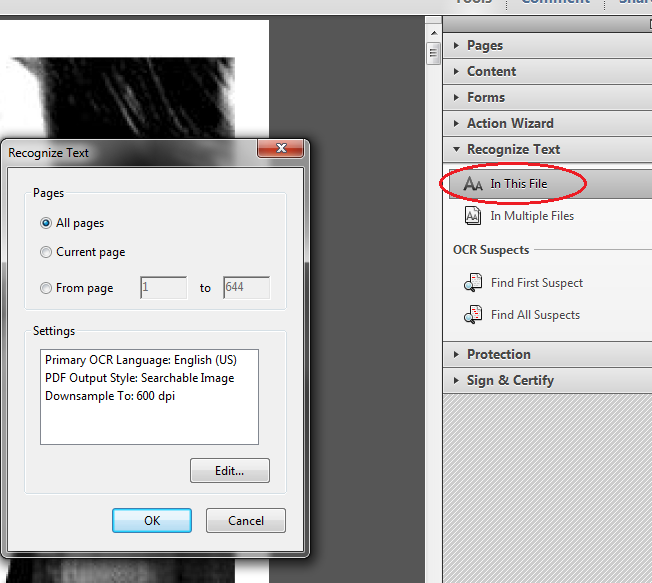
Click OK and let it run. It is not quick and will take about 1-2 seconds per page. This is a good time to take the second thumb drive to the scanner and scan in another book. (I was doing a complete book series.)
Save the new PDF as a regular PDF but add OCR to the name. This file size was 57.2MB.
Now optimize. Go to File > Save As > Reduced Size PDF. Use the default settings. Add the phrase Small to the end of the file name.
After reducing, my book was 27.4MB. Much more manageable.
#6 – Convert PDFs to AZW (Kindle) Compatible Files With Calibre
You will need to convert your PDF to a format that Kindle supports to view your book on your Kindle hardware. Don’t get me wrong, you can read a PDF on your kindle, but you don’t get the nice text resizing and other Kindle features that most of us like. This step isn’t completely necessary, but it’s worth it.
NOTE: THE AMAZON KINDLE CURRENTLY ONLY SUPPORTS THE .MOBI, .AZW EXTENSIONS, THIS IS THE EXTENSION THE EBOOK NEEDS TO BE IN.
Calibre is the best piece of software for the job. It’s free and easy to use. Download and install the software then follow the steps below for conversion.
- Open Calibre
- During setup, choose a location for your books.
- During setup, choose your format
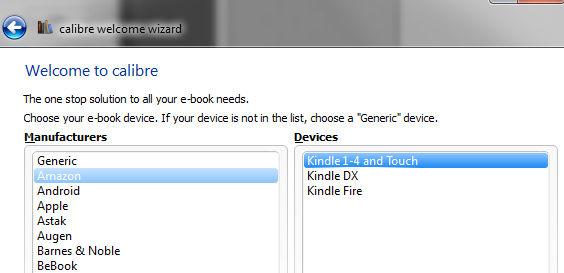 Calibre can send your books to your Kindle through the Amazon system. I do NOT recommend this! Amazon charges a fee for this service. Skip this option.
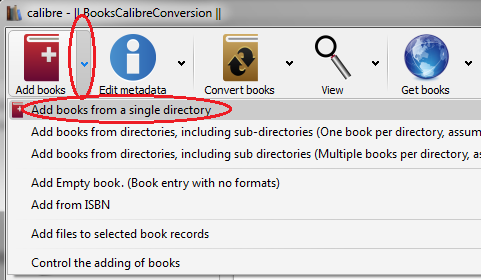
 - Select Add books, Followed by Add books from a single directory. (You can multi-select books in a directory)
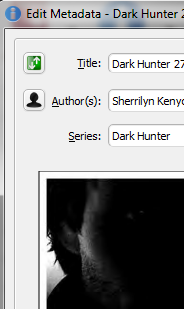
- After adding the book, include details. For example, I renamed the book to the series name, series number, then title. I added the author name. You can do this in the MetaData:
- Select the eBook that you wish to convert and click Convert > Convert Individually.
- Select the format you wish to convert to (If you are a kindle user, select “MOBI”). Then hit OK.

Calibre has now converted your book to a format you can read on your Kindle nicely – easier than PDF.
As always, I recommend that if you use a piece of freeware and love it, go back to the site and DONATE!! Reward someone’s great work so they can continue to support the software with bug fixes and updates. Calibre’s post-download page is HERE and contains a link to donate.
#7 – Send Books to your Kindle using Calibre
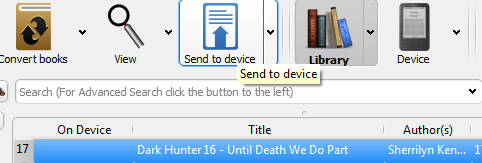
This one is easy. Plug your USB cable into your computer. Connect your Kindle to the USB cable. Let Windows detect it. In Calibre, you’ll see your device. Select Send to Device and let it go.
#8 – Organize Your Books on your Kindle
Kindle has a feature called “Collections” to help you organize your books. Using Collections on your device is clunky and time-consuming. Especially for large libraries. Check out my article on Kindle Collections with Calibre to learn how to properly organize your Kindle Collections.

