Whether you need to create a Table of Contents, a Glossary, or an FAQ, it is often necessary to link to content further down the page.
If you’re using WordPress, you could probably find a plugin to accomplish the same task, it’s simple enough to code a little HTML within WordPress.
Step 1: Create your Content
The simplest way to get started is to create your content without links. For example, let’s start a list of definitions for a glossary:
Admin Bar
Admin Center
Askimet
Then, below it we will define the terms.
Admin Bar: The admin bar is an area of the screen just above your site that lists useful administration screen links such as add a new post or edit your profile. You can use your settings to turn on (or off) the admin bar when viewing the site or the Dashboard.
Admin Center: The Admin Center is where you control everything about your WordPress site. To access the Admin Center you will go to a specific URL on the internet and enter your username and password. From there, you will be able to add/edit/delete Pages and Posts, control Plugins and Widgets, manage your users, and much more.
Askimet: Askimet is a plugin you can add to WordPress to filter out spam comments. Spammers make a lot of comments on blogs. When you activate it in WordPress, you will be taken to the Askimet site to set up an account. The cost ranges from free to minimal.
Your list will be considerably longer, but we will work using this example. For our example, here are the finished links:
Admin Bar
Admin Center
Askimet
Step 2: Use the id Attribute
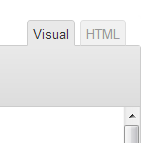
Within WordPress, switch from the Visual view to the HTML view.

First, go to each of the definition words and create an id Attribute. This is done with the HTML code that looks like this:
<a id="adminbar">Admin Bar</a>
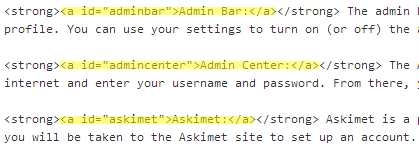
In the example above, we will place the code AROUND each of the definition titles – Admin Bar, Admin Center, and Askimet. Remember, we are assigning an id to the content in the page, not the listing at the top. The listing at the top will get a link.
Make sure you give your content useful ids and realize that the convention is to use all lowercase letters, but you can do what you like. When you’re done, your HTML should look like this:

This process will give us an anchor so that other places in this document and even other pages can link directly to the content.
Step 3: Set the Links
We will now revisit the terms list or the FAQ list or whatever you want to link and add links to the content.
While still in the HTML view, go to the list of terms (in our example, it’s Admin Bar, Admin Center, and Askimet). Add the following code AROUND each term:
<a href="#adminbar">Admin Bar</a>
If you’re familiar with HTML, you’ll notice that the only difference between a regular hyperlink and this link is that instead of using a full URL, we’re using the pound sign (#) and the id that we created above. After adding the link with the correct id for each of the terms, your HTML will look something like this:

Step 4: Test Your Links
Test your links and ids. If you have any problems, they are probably due to a misspelling. Fix any errors that you find.
Step 5: Extras
It’s not uncommon to create an id at the top of the page named top or “topofpage”. This allows you to create links at the bottom of each definition that can take the user back to the top of the page.
Example:
You can see a full working example on the WordPress Series #1 article on Terms. Additionally, our working example is here:
Admin Bar: The admin bar is an area of the screen just above your site that lists useful administration screen links such as add a new post or edit your profile. You can use your settings to turn on (or off) the admin bar when viewing the site or the Dashboard.
Admin Center: The Admin Center is where you control everything about your WordPress site. To access the Admin Center you will go to a specific URL on the internet and enter your username and password. From there, you will be able to add/edit/delete Pages and Posts, control Plugins and Widgets, manage your users, and much more.
Askimet: Askimet is a plugin you can add to WordPress to filter out spam comments. Spammers make a lot of comments on blogs. When you activate it in WordPress, you will be taken to the Askimet site to set up an account. The cost ranges from free to minimal.


