Using a cloud backup is an important strategy to a successful backup plan. To learn more about designing a backup system, see Backing Up Your Files. This weekend in the Weekend Series, you are going to organize your backup system.
Why should I keep a backup in the cloud?
You should keep a backup of anything that you don’t want to lose. It’s fine to keep a hard drive to back up your files, but you also need an off-site backup. You can copy a 3 TB hard drive once a month and keep it in your office at work. Then, at worst, you lose 30 days worth of documents, photos, and videos. But that also means that you have to take the time and remember to do your monthly backups. Backing up to the cloud is a great low-maintenance way to back up your files in a location outside of your home.
If you are concerned about security, then do your research. You can always encrypt your files before you back them up.
Preparing For Your Backup
Before you start backing up your files, you must prepare your files and systems for backup. This section includes the following tasks:
- Deciding What You Need
- Researching Cloud Backup Services
- Designing Your System
- Syncing Your Current Files
- Backing Up Your Computers
Deciding What You Need
Before you can configure or reconfigure a cloud backup strategy, you need to decide what you really need. This article assumes that you have all of the following types of files:
- Current documents that you access regularly
- Old documents that you rarely access but occasionally need to find
- Current photos/videos on your phone that you want to back up, but still access
- Old, unorganized photos/videos from devices
- Old, organized photos/videos that include vacations, family events, and old scanned family photos
- Computer backup & restore files
- Computer files and backups – such as website database backups
- Music files
Additionally, you must decide how much work you want to do on a regular basis and how much money you want to pay for cloud storage. We will consider the following two options:
- Minimum Fuss – If you want to set up a backup plan and occasionally do a little organizing, this is the plan for you. We’ll set up a backup plan that works automatically for less than $100 a year.
- Keep It Free – If you’re willing to do more work setting up and maintaining a backup system, we’ve got your back. We’ll set up a slightly more complicated backup plan for free.
Researching Cloud Backup Services
If you want to make an informed decision, do the research. Find the exact solution that works for you. If you just want to depend on us to do the legwork and rush ahead to implement one of our solutions, then skip on down to that section. Below are some great resources to start your research:
- About.com – This was my favorite resource. This page linked to lots of different information, and these were my favorite:
- 36 Online Backup Services: Ranked & Reviewed
- Online Backup Comparison Chart
- Interviews with the online services in the Online Backup Q&A
- Free Online Backup Plans
- Unlimited Online Backup Plans
- Free Backup Software
- CNet – CNet recently updated their cloud storage comparison table, and might continue to update it in the future.
- Wikipedia (online backup services) – There is a great comparison table on Wikipedia that helps you compare cloud backup services.
- Wikipedia (file hosting services) – There is a fantastic comparison table on Wikipedia that is worth viewing. You can also find file hosting services that you have never heard of.
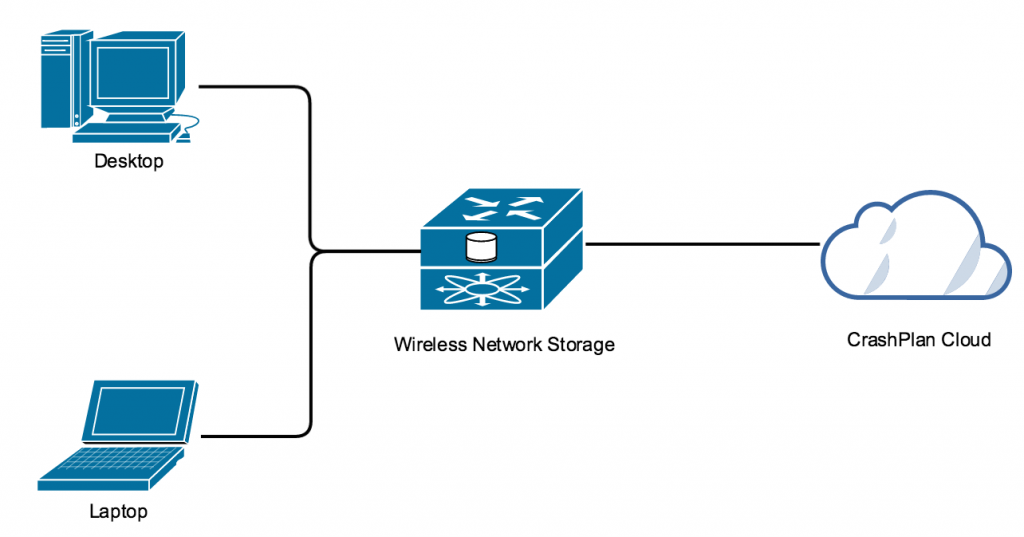
DesigningYourSystem
You can design a simple home backup plan using the following components:
- Desktop Computer – Because your desktop computer is always at home, and can always be connected to your router by an ethernet cable, your desktop computer is the best place to install CrashPlan.
- Wireless Network Storage – You only need a wireless external hard drive, so that all of your devices can back up to one location. Alternately, you can set up a Network Accessible Storage (NAS) system manually, or purchase a newer device such as an Apple Time Capsule.
- Devices for Backup – To back up other devices, such as your laptop, you only need to connect them to your wireless network to save your data to the network storage.
- CrashPlan Cloud – We recommend that you pay for a cloud storage plan, such as CrashPlan so that you can back up all of your files to one location.
Syncing your Current Files
Last month in the Weekend Series, you Organize Your Cloud Files. We recommend that you spend a little time keeping your cloud service clean and organized and use only one or two free services. Because media folders can become very large, it is important to manage your documents and media separately. Regardless of how you manage the files that you want to sync across several devices, you should have a process in place for backing up your synced files. We recommend that you do the following:
- Sync the documents and files that you access regularly with a service such as Dropbox.com.
- Use a second cloud service such as OneDrive to back up photos and videos from your mobile devices.
TIP: Do whatever you can to get some free space on Dropbox or OneDrive. Lifehacker has a great article about How to Maximize Your Free Storage Space on Every Cloud Service. - Set alerts on your cloud services to remind you to clean out your accounts when you approach your free cloud storage limits.
- When you receive an alert, go through the files in your cloud folders and organize them into your local file system.
- Back up your files regularly to a local and a cloud backup system.
Backing Up Your Computers
You should already have a general backup strategy in place for backup and recovery of your computers in the event of failure or theft. If you have a Mac, you should set up your Time Machine to backup to an external or network hard drive so that if your computer needs to be repaired or replaced you can recover your files and settings easily. If you have Windows 7, you can set up Backup and Restore. For Windows 8, the process is a little more complicated.
Backing Up to a Local Drive
As a best practice, back up your files to an external or network hard drive so that if your computer needs to be repaired or replaced you can recover your files and settings easily. You should back up the following files from all of your computers to a local external hard drive:
- Operating System settings and recovery files
- Documents
- Photos
- Videos
- Music
Backing Up to the Cloud
Two important factors in your cloud backup strategy include how much work you want to do on a regular basis, and how much money you want to pay for cloud storage. We will consider backing up to the cloud with minimum fuss (and a fee), and backing up to the cloud for free.
Backing Up to the Cloud with Minimum Fuss (Recommended)
If you want to set up a backup plan and occasionally do a little organizing, this is the plan for you. In this example, you will set up a backup plan that works automatically for less than $100 a year.
To back up your files to the cloud with minimum fuss using CrashPlan, complete the following tasks:
To install CrashPlan, complete the following steps:
- Sign up for a paid account with CrashPlan. (You might want to try the software for local backups using the 30-day trial before making your purchase.)
- Download and install the software on the main computer that you want to use to back up to the cloud, such as your desktop computer.
- Download and install the software on any additional computers that you want to set up to download to your main computer or network drive, including your laptop.
- After you install the software, you can sign in using your account email and password. Apply your license key to ONLY your main computer that will be backing up to the cloud. (The lowest tier of paid accounts allows you to back up to the cloud from only one computer.)
For general information about doing a backup, see Backing Up Your Files. To back up your computer files to a single external hard drive using CrashPlan, complete the following steps:
- Open CrashPlan on your main computer.
- From the left menu, click Backup to review the default backup settings.
- In the Files section, click Change… to select the files that you want to back up. From your main computer, you should back up your external hard drive, but you can also back up additional files that are accessible to your main computer. Keep in mind that the files that you back up from your main computer to CrashPlan are not saved in your external hard drive.
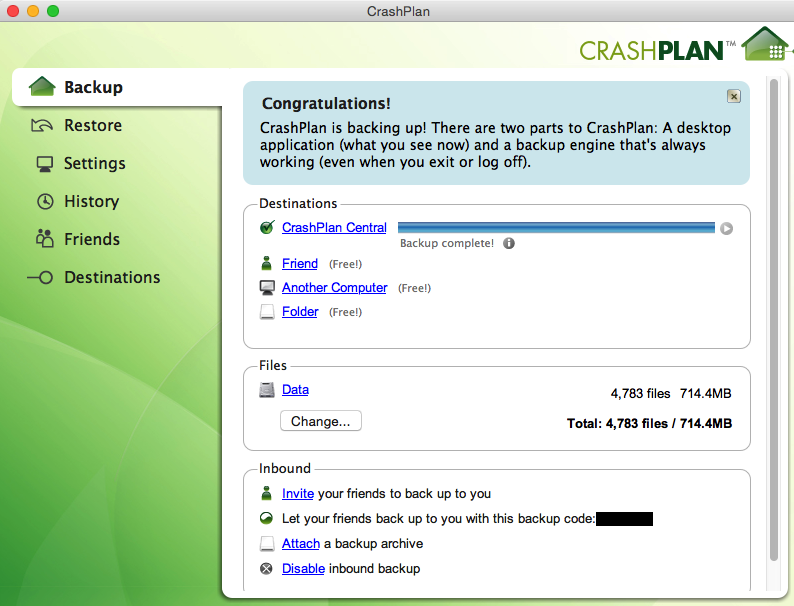
- By default, CrashPlan will back up the files that you select to CrashPlan Central – the “cloud” in CrashPlan. Be patient. It could take over a week for CrashPlan to complete a 1TB back up, depending on your ISP. As an aside – Time Warner sucks.
After you have finished setting up your computers to back up using CrashPlan, you’re done. CrashPlan will run in the background and pick up new folders and files that are located within the folders you have already set up to back up. This means that if you you have a new folder of vacation photos to back up, if you add the folder to Data > _Backups > Pictures > Vacations, and the Data folder was already set up to back up, then you do not have to make any changes in CrashPlan. The folder will be automatically backed up.
Backing Up Your Additional Computers
To back up the computer files from your additional computers to a single external hard drive using CrashPlan, complete the following steps:
- Choose one of the following methods to set up a large (2TB or greater) hard drive:
- Attach an external hard drive to your main computer and share it across your network.
- Install a second hard drive in your desktop computer for backups and share it across your network.
- Set up a Network Accessible Storage (NAS) drive and share it across your network.
NOTE: By default, you cannot backup to your NAS drive using CrashPlan. See my article on how to Use CrashPlan To Automatically Backup To A Network Drive NAS for workaround instructions.
- Open CrashPlan on each computer that you want to back up to your shared external hard drive.
- From the left menu, click Backup to review the default backup settings.
- In the Files section, click Change… to select the files that you want to back up.
For example, you might want back up your Dropbox files from your laptop to your shared drive.
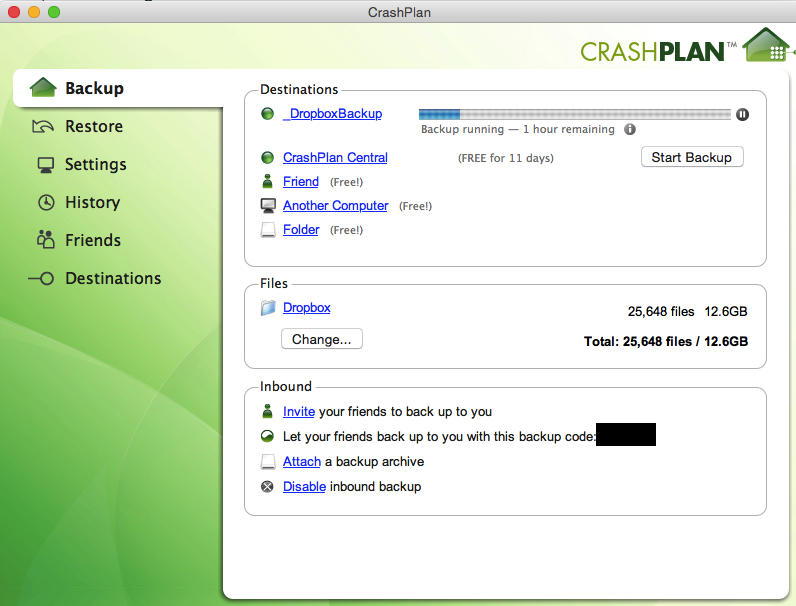
- From the left menu, click Destinations and then click the Folders tab to back up to an attached hard drive.
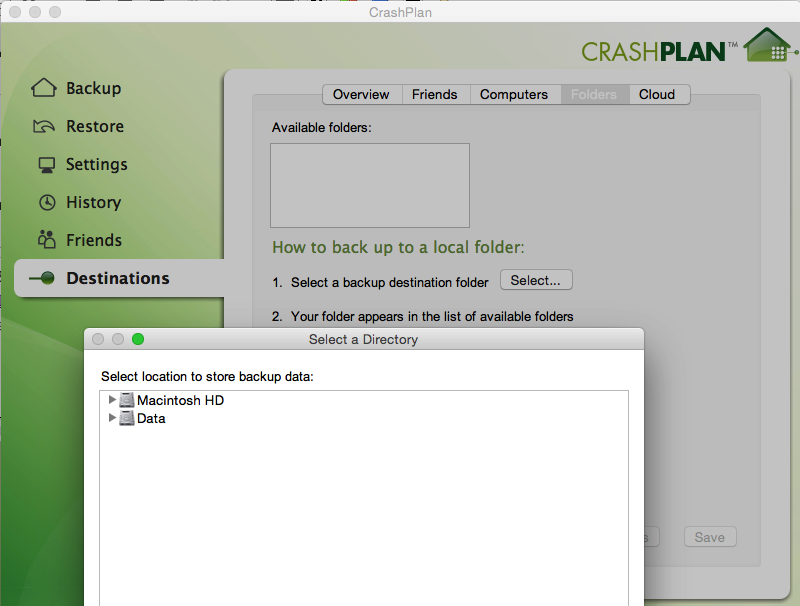
- To set up a backup destination, click Select… and navigate to the folder that you want to use as a backup.
For example, create a folder in your network hard drive named_DropboxBackupthat you will use as the destination for your Dropbox backup.
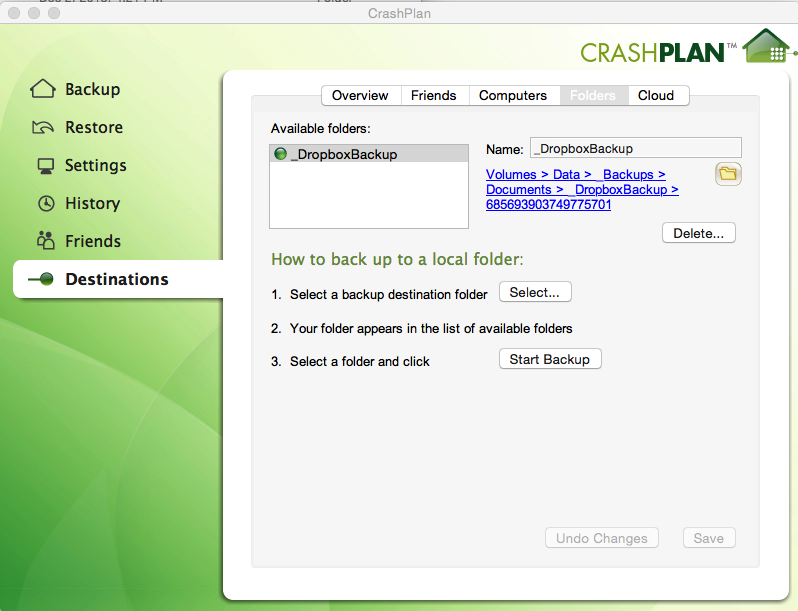
- Repeat this process for all of your computers except your main computer. Unfortunately, CrashPlan will not allow you to backup computers to your external drive and then backup your external drive to the cloud.
Backing Up to the Cloud for Free
If you don’t want to pay for your online backup, you have other options. Backing up online using CrashPlan is simple and extremely low maintenance, and that’s what you’re paying for: the convenience and ease of use. If you’re willing to do a little extra work, you can get around it. To learn more about backing up your files to the cloud for free, see Backing Up to the Cloud for Free.


